
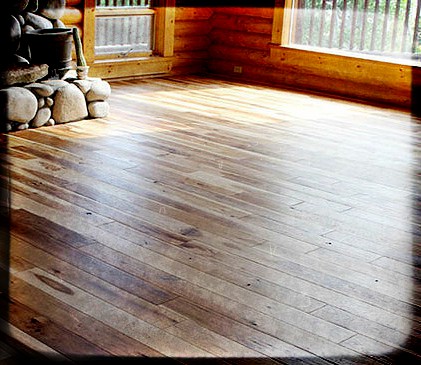
 Hardwood flooring looks fantastic in most homes and can last for many decades if properly maintained. However, sometimes a once gorgeous floor can start to lose its luster, especially if there is a large amount of foot traffic or pets running around on a regular basis. Some homeowners even resort to covering them with a carpet, which is quite a shame.
If this sounds like your wood floors, I have good news for you. Instead of trying to hide them, you can restore them to their former beauty (and protect them for many more years) by simply refinishing them. In this article, I promise to explain everything you need to know about refinishing your wood floors and if you get stuck, I will answer your questions in the comment section below. Let’s get started!
What Does Refinishing Hardwood Floors Involve?
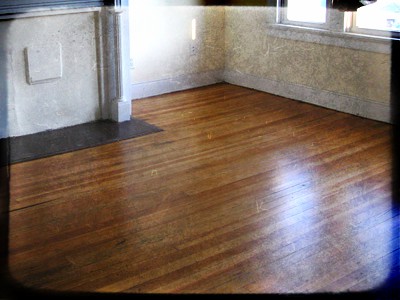
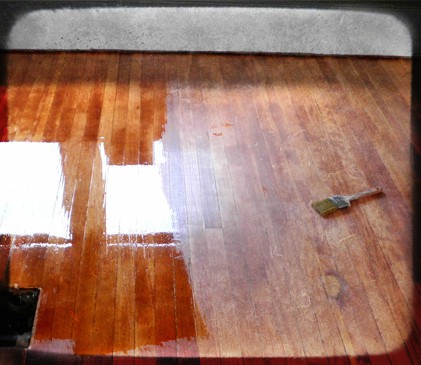
Unless your flooring is brand new, hardwood floors don’t stay gorgeous on their own, a coat of finishing product is needed to protect the floor from regular usage. Refinishing hardwood floors is the process of removing the existing layer of finishing product (which is usually done using a sanding tool to get down to the bare wood) and then reapplying another coat to your floors to protect them and make them look brand new.
If your wood floor doesn’t currently have a finish applied, it still needs to be sanded down for a complete bond, you can’t simply pour on a finishing product. Also, if it still has most of its finishing, with only a few light, low impact scratches (that does not go all the way through the layer), it can be re-coated instead of refinished. We will discuss that in more details a little later.
Is Refinishing Hardwood Flooring Worth It?
 Absolutely! Not only will it restore your floors to their former beauty but it will also protect your floors from another couple years worth of wear and tear. If you ignored the need to refinish, you could end up with hardwood floors that are very damaged, which might even require replacement planks. This can prove to be very expensive (not to mention stressful) so just like you take a car for a service to keep it running well, you should likewise maintain your wooden floors on a fairly regular basis.
I am sure that you want a wood floor that looks amazing, something that you can show off to your friends and family when they visit. Even if you are planning to sell the house in the near future, remember that a well-maintained hardwood floor is very highly sought after and will definitely increase its value. So if your floors are looking a little tardy and you want them looking new again, refinishing will help you do that!
Can’t I Just Re-coat My Wood Floor Without Sanding?
Yes, it is possible. However, it is important to understand when it is suitable to do so. Basically, if surface damage (scratches, etc.) has only gone into the finishing itself, then a maintenance coating can be applied and be sufficient to keep your floors protected and sanding down to the wood is unnecessary. It is also worth noting that if your floor has been waxed, it is very important to remove it completely otherwise the applied finishing product may bubble and look horrible.
Just take a careful look at the damages to your flooring and don’t be quick to assume that only a recoating is needed. If any surface damage as reached the wood itself, I highly recommend that you do a full refinishing instead to ensure that your floors don’t deteriorate even more.
Is Refinishing a Hardwood Floor an Easy Process?
Hardwood floor refinishing is not a simple project for most homeowners; it involves time, effort, and a certain level of expertise and experience. For this reason, flooring contractors are often called in to do the job. However, this doesn’t mean that you cannot do it yourself and provided you follow this guide closely, it is possible to complete it without a professional’s help and by doing so, save a decent sum of money. Either way, I am here to help you make an informed decision! Let’s look at the pros and cons:
Option 1 – The DIY Approach to Refinishing a Wooden Flooring
- The most obvious advantage of doing a job on your own is the money you will save on labor. You can save up to 70% of what you would pay for a professional wood refinishing service may cost. Just remember, though, if you botch your floors it’s all on you and you will probably cost you more to fix.
- You will have complete control over the project allows you to do things your way. You can pay attention to every little detail and your floors will end up looking exactly how you wanted them, all with a little research and patience. This is hard work, however, especially since you are just one person (unless friends and family are willing to help you move furniture, sand, etc.) so just keep that in mind.
- There is a special satisfaction that comes with refinishing hardwood floors yourself. Although the logistics can be tricky, the sawdust and products can be messy and the project can take a lot of time, the pride that comes with a job well done is priceless. Plus you can totally boast to your friends and family that you “refinished these floors yourself”, which I personally think that is too damn epic.
Option 2 – Hiring a Contractor to Refinish Your Wooden Floors
- Professionally certified flooring experts carry such titles because they are THE professionals. An NWFA (National Wood Flooring Association) certified professional had to take an extensive test of knowledge and experience in order become certified.
- Given all their experience and resources a contractor will most definitely finish the job faster and with better quality than any proficient amateur. Not only will the job be done quickly but they won’t make any mistakes. There is also a good amount of work that goes into preventing a large mess from being made and professionals know what to do to get that done effectively.
- These are the guys who do this same work day after day, this is how they support their families, so they definitely know the ins and outs of the project and how to deliver the absolute best results for you. Hiring the right contractor can drastically change the look of your floors for the better. For the best contractors flooring is an art and they produce work they are proud to say they were responsible for.
Special Offer: Get a Free Hardwood Refinishing Quote (United States Only)
We have partnered with Networx to help our readers get affordable hardwood refinishing quotations from contractors near them. Simply
, fill your details and you will get a few within 48 hours. There is zero obligation and this service is 100% free. 🙂How Much Does It Cost to Refinish Hardwood Floors?
Presuming that you are not doing it yourself and want to use a certified professional, hardwood floor refinishing costs around 3$ – 5$ per square foot of floor. There are a few things that can add a little to that price tag, such as the wood type it’s being applied to, the quality of the finishing product, the number of coats needed and the company that is doing it for you (they might have decades of experience and hundreds of excellent reviews from past jobs).
This price is also excluding any repairs that you might need to be done and the removal of furniture from the working area (most will include this for free but it is worth asking so there are no horrible surprises). Keeping this in mind, a medium to large sized hardwood floor will cost about $1000 to be refinished properly, with all the bells and whistles.
Before you contact anyone, record the size of the floor (square foot) and the product you want to use on it. Keep in mind that you must also choose a sheen, ranging from glossy to matte finish. I will discuss this in a little more detail shortly. Most contractors will have a selection to choose from, all with a varied price tag. I recommend that you write them down and do your own research on each one, looking specifically for decent reviews online.
What Types of Hardwood Floor Finishes Are Available?
 There are three major types of wood floor refinishing types: water-based, polyurethane and acid cured. The water based finishes are more economically friendly but also on the less-durable side, polyurethane is the most commonly used and provides a durable finish with little hassle, acid cured finishes are extremely durable yet are the most difficult (and dangerous) to apply. For more info, please read this article from hardwoodfloorsmag.
After you have made your choice (let me know if you require further guidance, I am here to help), I recommend that you choose a sheen (reflective quality) for the refinishing product. Unless you want to see your reflection when you look down at your floors, I don’t usually suggest you go for a full gloss option. While I might be exaggerating a little, go for something that suits your desired look. Most shops or contractors will provide you with pictures or even samples that show different types of sheen so just ask.
Part 1 – What Will I Need To Refinish My Wood Floor Myself?
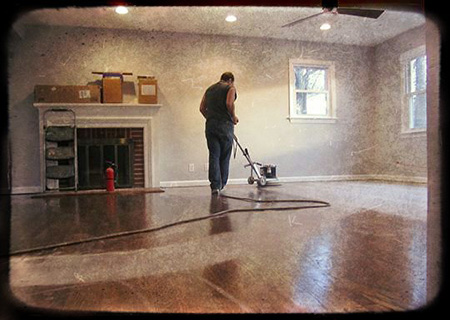
- An orbital sander – This will need to be rented in most cases and they are readily available at nearly all home improvement stores that offer equipment rental for about $60 a day. It is good to note here that this type of sander is different from what the professionals will be using, they have a larger more powerful sander called a drum sander. The drum sanders are sensitive pieces of equipment that can cause very unsightly damage when used by anyone who has not been trained, they need to be used with the grain of the flooring and are somewhat difficult to control.
- A smaller sander – This will be needed for getting into the spots the orbital sander can’t reach (near corners and other tight spots). Although you could sand these areas by hand, I don’t recommend it. It can add many hours to your project and that is presuming that you don’t give up half way lol. If you are sensitive to dust, goggles, and dust masks should also be purchased for the job ahead.
- A Vacuum Machine – I recommend a non-fancy one for cleaning up sawdust, etc. Please make sure that you don’t use a cyclone or water based vacuum machine. These often clog up and sometimes even break when sucking up bits of wood and other leftovers from a floor refinishing project. You have been warned! You might consider hiring one for the day if you don’t have one already. Shop Vacs are usually available at most hardwood or home improvement stores and it is well worth it.
- Your Wood Refinishing Product – As mentioned above, you need to decide on the type, the desired sheen (reflective quality) and the quantity needed (based on the size of the room / number of coats you want to apply). Usually, most floors need at least two but keep in mind that using quality brands often reduce the need for any more than that, which often makes them more cost effective in the long run. While all this is your choice and responsibility, feel free to ask me for advice and I will try and guide you where possible. I would love to hear from you!
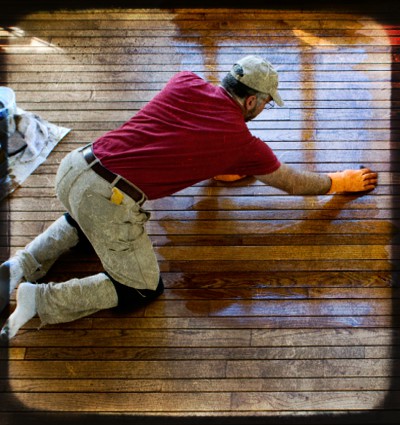
- Regular Varnishing/Sanding Equipment – Painters tape and plastic tarps really help in containing the mess from the sanders. Paint rollers or similar applicators (and trays) that will be used to apply your chosen finishing product and smaller brushes are good for areas that require precision. Don’t forget to buy some sand paper (variety of different grits), the hardware or home improvement store will usually be able to give you specifics.You might also need a putty knife and a pry bar/hammer if you are doing a few minor repairs (don’t forget to buy matching wood putty if this is the case).
Part 2 – How To Refinish Hardwood Floors, Step by Step
 First,get all that furniture out of the way and give yourself some room to work! The floor that you are working on should be completely free of all objects. If there are fixtures or other appliances, you will want to cover these with plastic tarps to protect them from sawdust. You will want to seal off the room you are sanding from other areas (that are not being refinished), and this is where your painters tape come to the rescue. Tape up all outlets, gaps under doorways and other cracks where dust might sneak out.
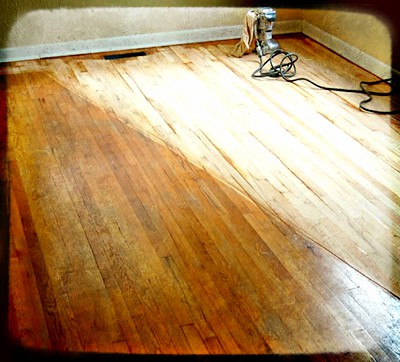
 Third,now that you’re all set (and you have your protection on), sand sand sand (repeat a number of times lol). It is important keep the sander moving because if you leave it in a single place for too long, it can create an uneven surface. Remember to sand the wood floor uniformly throughout the room, you don’t want to start applying a coat of finish to your wood floor, only to spot an area that wasn’t sanded properly. Lastly, it is ideal to start with a rough grit (to remove the paint or previous finish) and then to use a fine grit to make your floors “silky smooth”.
 Fifth,if you want to stain your floors a different color, do it now. The procedure is almost the same as refinishing (will write an article soon) and obviously, this is optional. Once the stain has been brushed on, allow it to dry completely before continuing.
At the end of the day, whether you decide to refinish your hardwood flooring yourself or to hire a contractor to do it, it needs to be done, especially if you have a lot of foot traffic or indoor pets. Although it takes time and effort, it is definitely worth it as it protects your wood floors and restores them to their former beauty. It also helps you keep your floors in excellent condition, which eliminates the need for costly replacements in the future, so it is definitely worth scheduling a regular refinish every couple years. I hope this guide has helped you with this topic and if you need help, please feel free to ask your questions in the comment section below.
Bill Reed
Latest posts by Bill Reed (see all)
- Acacia Flooring – Your Ultimate Guide - January 20, 2017
- Refinishing Hardwood Floors, The Ultimate Guide - October 6, 2016
- Walnut Flooring, Your Authority Guide - July 28, 2016
Thank you for the very detailed instructions. They are the best out there!
Does bamboo flooring require anything extra and should I do anything different?
Hi Kelly, thanks for your kind words. Lets hope Google thinks the same hehe. Pretty much the same process, let me know how it goes!
Very thorough post. Thanks! Would you recommend doing this on your own or having a company do it for you? I might do it on my own if it’s easy enough.
Hi Christian! Thanks for your kind words! Unless you have the time and energy, I have found that most prefer to get someone to do it for them. However, this article has everything you need to handle it yourself, if you choose to.
Our hardwood floors are starting to look worn. We are thinking of having them refinished by a professional. Like you said, a contractor will be able to finish the job the fasted and with the best quality. Thanks for sharing!
Hi Annika! Awesome, hope your floors turn out fantastic 🙂