 Wood flooring is beautiful. It has a depth and richness of color that leads to a feeling of warmth and hospitableness. However, although most hardwood floors are fairly durable, general wear and tear (or accidents) often happen and this can be absolutely heartbreaking, especially if you take pride in your home.
But don’t worry, we are going to fix that! In this article, I will teach you how to fix any hardwood flooring problems yourself, even if it means replacing entire parts of it! By the end of this, you will have actionable insight on how to restore your wood floors to their former glory. I hope that you are excited, let’s start with education on damage prevention.
How Can I Prevent Damage to My Hardwood Floors?
All processed wood is dried at the mill, leaving hollow spaces within the physical structure. Thus, when enough force is applied to the exterior of your hardwood floors, there will be consequences (such as dents or scratches). It is important to note that although there are different types of hardwood (each with their own different strengths), with enough impact, all wooden floors will dent or scratch.
- Choose a hardwood that is very strong (such as teak flooring). This doesn’t make it immune to damage, just more resistant to it.
- If you are a pet owner (dog scratched hardwood looks horrible), set a recurring reminder to trim their nails as this can also cause lots of damage.
- Wear soft shoes (ladies, please be careful of your high heels on your flooring) and encourage guests to leave their shoes at the door.
- Strategically place rugs (that compliment the decor of course) in high traffic areas to reduce general wear and tear on your floors
- Keep your hardwood floors clean at all times. Put together a quick daily schedule to sweep, dry mop and pick up any items that could be stood on.
- Do you have heavy furniture? Using fabric pads can eliminate the need for any hardwood floor repair by preventing chairs, couches, etc. from scratching your floors. Highly recommended! Also, stay away from chairs with wheels as they can be damaging to your floors.
PRO TIP #1 Floor finish (such as varnish) does add some “wear and tear” resistance to your floors, especially those that are infused with ceramic or titanium particles. However, this doesn’t mean that you can drop something heavy on your floor and expect it to be immune, as I have already explained. Also, please be cautious of applying too many coats of your preferred finishing, it can make your beautiful floors look plastic and fake. If you want to learn more, I highly recommend this article from the Cornell university about
preventative maintenance for your hardwood floors. Enjoy!
Special Offer: Get a Free Hardwood Repair Quote (United States Only)
We have partnered with Networx to help our readers get affordable hardwood repair quotations from contractors near them. Simply
, fill your details and you will get a few within 48 hours. There is zero obligation and this service is 100% free. 🙂
Fixing Scratches, Dents and Gouges On Your Hardwood Floor
If you have a busy family or social life and often entertain in your home, the occasional dents or scratches (sometimes even deep ones) in your hardwood is almost inevitable. Don’t distress, most of these hardwood gouges and other surface damage can be repaired fairly easily if you take the time to follow these steps carefully.
Step 1 - Sanding timeStep 2 - Clean the areaStep 3 - Apply wood fillerStep 4 - Add the finishing
Assess the scratches in the wood floor to determine if the scratches are repairable. If they are a little deep, it might be worth replacing the entire plank of wood with a new one. However, if the damage is not excessive, go ahead and use the 180 grit sandpaper on the affected area to smooth it out. It is important to make sure that you always sand along the grain of the wood, otherwise, it can make the area look horrible afterward.
Rub mineral spirits over the sanded area. I usually take an old rag, dab some of the spirits on it and then rub the area gently. This is important because you need to smooth out the area and remove the fine dust before applying the wood filler in the next step. Although it usually dries pretty damn quickly (sometimes in less than a minute), please make sure that the area is not wet when you move onto step 3.
Hardwood floor repair with premixed filler is pretty easy if you use a plastic putty knife. It is important that the wood filler matches the color of your wood floors otherwise, you will be left with an unsightly patch that doesn’t match the rest of the surrounding area. Personally, I feel that this looks almost as bad as the scratch itself. Once it dries, use the sandpaper again to smooth out the excess filler.
If your floor boards have a coat of paint, varnish, polyurethane or a similar finishing product, make sure that you apply this over the wood filler so that it matches the rest of the floor. Ideally, use a natural bristle brush when doing this as foam rollers (or non-natural bristle brushes for that matter) tend to (sometimes) leave air bubbles in the finish or result in an uneven layer of product, both of which are quite unsightly.
PRO TIP #2 Do not use regular wood putty, as it normally does not take color evenly and the patch will be evident. I have some clients that have said it worked for them but for my blog readers, I recommend that you use the premixed wood filler.
How to Remove Horrible Dark Stains on Your Hardwood Flooring
Nothing is worse that an unsightly stain on solid wood flooring. Whether it appeared due to water damage, household products, spilled juice or even a family pet who couldn’t hold in their biological needs overnight, it really detracts from the beauty of the wood. Regardless of the cause, repairing hardwood floors isn’t too hard, here are the steps that you need to follow:
Step 1 - Use vinegarStep 2 - Lightly sandStep 3 - Use chlorine bleachStep 4 - Refinish hardwood
Before you do any sanding or use the bleach, always try and clean the affected area with vinegar. Although there are lots of products that have been made to clean hardwood floors, vinegar is often all you need and is usually fairly cheap, even if you purchase a large bottle. Ideally, use a sponge with a slightly rough side and after dosing the area with vinegar, scrub it and hope that it disappears.
If that didn’t work, don’t give up. Your next course of action is to lightly sand the marks on the floor with 100 grit sandpaper or to use steel wool to scrub the mark off. If you want to be even more cautious, use an even finer grain of sandpaper and go rougher if that didn’t give you any decent results. You are doing this to remove the top surface only, don’t do this for hours or sand/scrub excessively in a single spot.
If you are still struggling with a really tough stain, put on some rubber gloves and apply some chlorine bleach to the stain. It is important to confine it to only the marks, do not let it splash onto your unblemished floor! Check it every hour to see if the dark marks are slowly starting to lighten (which it will). When the mark disappears, immediately remove the bleach (completely) and use vinegar to neutralize the area.
If the dark stain has disappeared,
refinish that section of the wood floor so that it matches the rest of your floors. This is important! Once complete, give yourself a pat on the back, your hardwood floor repair task can officially be ticked off your to-do list!
PRO TIP #3 Although gloves will protect your hands, always remember to cover your nose when using strong chemicals like chlorine bleach and make sure that while waiting for the stain to lighten, you keep pets and children (especially babies) away from the area. The U.S General Services administration has a great article on
removing stains and I encourage you to check it out for more reliable information.
PRO TIP #4 If your hardwood has been severely water damaged (perhaps you were the victim of flood waters or maybe a burst geyser soaked your wood floors for an extended amount of time), seriously consider
painting the floors instead of pulling them all out. There are even some paints that still give you an authentic “wood look” so don’t give up on your floors.
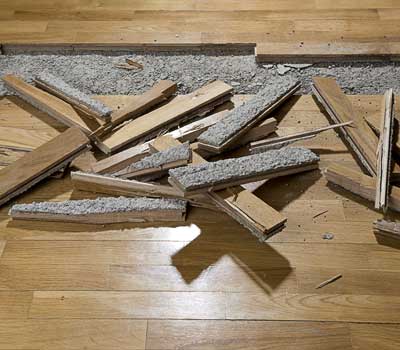
Hardwood Floor Repair Using Replacement Planks (Easy Diy Steps)
 Sometimes, even with all your valiant efforts to fix the damaged wooden planks on your floor, they could still look horrible. If this is the case with your floor, your next option is replacing the busted planks with new ones. Unfortunately, this is not always possible, especially if you don’t have any spare and the retailer (or contractor) who installed the floor tells you that they don’t sell that specific size, color, species of wood, etc. I am not saying that you cannot make a plan (get them specially made, reuse old pallets for their wood) but it definitely throws a spanner in the works and this is one of the major reasons why I always tell clients to keep spare floor planks sealed away in their garage after an installation in case they are faced with this exact situation. It is also wise to determine whether or not it is worth replacing the entire hardwood floor. If you have excessive damage in multiple locations, this might be your best course of action if you want to restore the beauty in your home.
If you do have a couple lying in storage (or can get your hands on some), then you are in luck because removing the old plank and installing them isn’t very difficult at all, just follow these simple steps and you get this project finished quickly.
Step 1 - Remove planksStep 2 - Measure replacementStep 3 - Secure itStep 4 - Add finishing
Take out the damaged hardwood floor planks by removing the nails from them (if there are any) or pry them free if they are stuck down with a strong adhesive. If you plan to salvage some of the plank (perhaps only a portion of it is damaged) for some other wood floor repair project, make sure that you do this carefully. A wood chisel can really help you with this task so make sure you grab one from your local retailer.
Cut a replacement strip to the same length as the one removed. Use a tape measure and triple check it until you are completely satisfied that you have the correct lengths (and even perhaps width, if you are using different planks from the original installation). Depending on the type of hardwood floor you have, you might need to also cut a groove into the side so that it “clips” into the rest of the wood flooring.
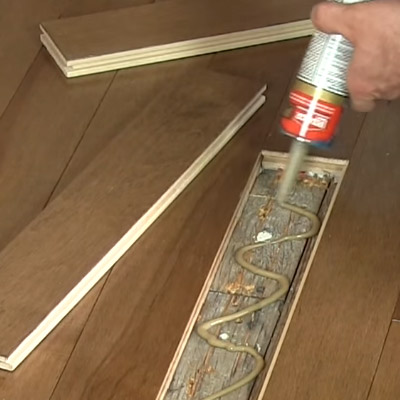
Presuming that the newly cut plank that is going to be used to patch your hard wood floor is the correct size, apply construction glue to the backside and gently tap it into place. If the rest of the wood planks were affixed using power cleats, you can follow this procedure on the new plank. Also, make sure that the gaps between the hardwood are even.
The last step in a successful hardwood floor repair job is making sure that the repaired area matches the rest by using a varnish, polyurethane, etc. in the same color tone. After sanding and cleaning it properly, it is important to spread the finish evenly and ideally, keep your brush strokes to the new plank so that it receives most of the product. It may be necessary to apply a couple coats, just keep going until it looks the same as the rest.
PRO TIP #5 You can
use a circular saw to help break up a stubborn plank when trying to remove it. Additionally, if you only want to remove a portion of the plank (instead of the entire thing), you can use the saw (or a carpenter’s square) to do that. Just make sure that while removing the plank, you don’t damage any surrounding hardwood boards.
So in conclusion, the process of doing hardwood floor repair is not difficult, provided you are willing to put a little bit of effort into it. If your hardwood has an unsightly scratch, a couple dark stains or even a broken plank, I hope that this article will help you restore your floors to their former glory. In some of my upcoming articles, I will teach you how to clean them and help you keep their warmth and character shining brightly for years to come. Feel free to pass this article on to your family and friends, and if you have any questions, please comment below.

Any comments are welcome, I will try and help you as much as I can!
Bill, I just had new hardwood floors installed. My installer used a Chestnut stain, then applied 2 coats oil-based poly. The final coat was applied 9/22/16. Yesterday I noticed a couple of the boards are very light in color and do not blend in with the other flooring at all. And yes, I was cursed with the “perfectionist” gene. But, these boards are extremely visible—rugs, nor furniture will be covering them. Is it possible for the installer to replace these boards now that the poly has been applied? Please say “yes”! Thank you for your time and for your expertise.
Hi Denise! I am not going to guarantee it but yes, it should be possible. Hehe don’t worry, I am the same, it causes great anxiety if things are not done properly lol. It is a little bit of a curse when it comes to blogging because I refuse to post anything unless it’s perfect, been working on a refinishing article for almost a month now 😛
I have not seen horrible stains on hardwood flooring before. It’s good to know that it can stain before getting it installed. Maybe I should make sure that I have all these ingredients I need to clean it off in an easy to find area.
Hi Sarah, little confused that you haven’t seen any stains and yet you want the ingredients to clean one but anyways, good luck!
I have a Great Dane dog and since I live on my own, he lives inside the house with me. I am renting the home I live in and it has wooden floors. My floors have so many scratches from my dog and he’s going to continue ruining the floors with his nails if I don’t do something about it. I’m scared to loose my safety deposit on the house because of the floors being ruined. My friend suggested I cut my dogs nails but they are too thick for me to cut them. any advice is welcomed.
Hi Trish! Yes, that large dog is going to continue to scratch your wood floors unless you do something about it. I recommend either keeping him out the home but if that is not an option, take him to your closest vet as they usually are willing to cut your pets nails at a reasonable price. I went a couple weeks back and they charged about $10. Hope that helps!
Hey there Bill,
I have parquet floors in my house. They used to be covered in carpets but I ripped them out as they were disgusting and old. The old man that owned the house before me had a few cats. Some of the parquet has obviously been urinated on by the cats and the man had not cleaned it up so I’m now left with wood floors that have soaked up cat urine. Is there and way I can get rid of the cat urine smell and is there any hope for my parquet?
Hi Joanne! Honestly, it will be rather difficult. My suggestion is to reseal it (the smell might eventually come back though) or alternatively replace the section that has been damaged. Although there are various cleaners on the market, I suggest you do one of those two options. Hope that helps!
Hello, I have hardwood floors in my house. You mentioned in your article that I must put fabric pads under my furniture to prevent scratching the floors. I have wheels on all 3 of my couches, will these scratch my wood floors and if so what do you recomend I do?
Hi Kita! Personally, I would remove those little wheels completely (unless you make a habit of moving your furniture around a lot) and put fabric pads (or just a small piece of carpet) under each leg, just to make sure that it doesn’t scratch the wood floor. Hope that helps!
Hey Bill, I read your article on pallet flooring and this one, both were very informative. I palleted a small room in my granny flat an I realized that I do not like one of the planks I used as its doesn’t look the same as the rest of the floor. I was wondering if I could use the method you explained in this article on using replacement planks (obviously I will use a pallet plank)to replace the plank with a different one?
Hi Fred! Thanks for your kind words! Yes you could, what you have described is one of the major benefits to using pallet; you can easily replace planks without major expenditure. Let me know how it goes and if you need some assistance with the process, I am here to help!
In this article you mentioned that (it’s important to note that there are different types of hardwood (each with their own different strengths), with enough impact, all wooden floors will dent or scratch). Please could you tell me the top 3 most durable wood types. I see you mentioned that teak is one of them. Thanks in advance.
Hey Rob! There are a number of other types of hardwoods that are very strong. Brazilian Walnut, Tiete Rosewood and Tiete Chestnut are crazy tough. Hope that helps, thanks for stopping by!
Unfortunately, sanding is something that can’t be skipped out on. You’re right, probably some of the best advice ever is to sand with the grain of the wood. The amount of time put into sanding the wood will reflect in the finished product. The stain just seems to stay with the wood better for a more natural look.
Hi Jasper, thanks for your input! Feel free to message me your business name and I will mention it on my Twitter account, don’t want any links here. Thanks 🙂
We have linoleum flooring in our kitchen and think that hardwood floors would be a good way to increase property value. It is good to learn that there are a lot of ways to repair a hardwood floor. Cleaning the affected area with vinegar would be a good thing to do before sanding or bleaching the floor. We will remember these tips in the future when our hardwood floor is installed.
Hi Jade! Thanks for your comment! I removed your link as it was unrelated to your message, but if you want to do a guest post for your company in the future, just email me privately please. Appreciate it.
Hi Bill. We have 3 large rescue dogs that have worn several ‘paths’ on our ‘real’ Red Oak floors.
The worse area is about 2 feet long and a foot wide. Can we sand, stain and seal this area
without it looking like a bad patch job?
Many thanks!
Hi Sterling! Absolutely, I also recommend that you check out my refinishing article, it will help you with this job.